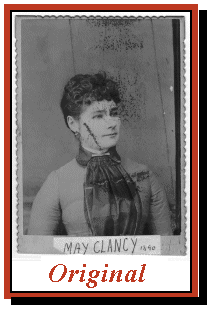

I have no idea who May Clancy of San Pablo was, or what she was doing in 1890 when this photo was taken. But she was a mess now. The sepia tone had faded over its 107 years of life, and had scuffed off in several places. Worse, something - "perhaps a mold" - had eaten away at the emulsion, leaving a series of birdshot patterns in the backdrop and upper part of face. A long string marred her right cheek, and her bodice was blotched with an ominous triangle of decay. Bonnie and Clyde looked better after the shoot-out.
In other words, when Mary Ellen gives you a photo to restore, she doesn’t fool around. I began by scanning the image at 300dpi (dots per inch), which yields a relatively large file (5.56 megabytes), but captures more detail than a lower resolution would. Even my 686, with its thirty-two megs of RAM, lumbered during some of the procedures. Since my scanner is reaching antique status (it’s two-and-a-half years old), the scan ["Original"] looked even worse than the photo. Using Adobe Photoshop 4.0 and a plug-in filter called IntelliHance, I let the software alter the values of the scan, then tweaked things a bit by hand to produce Step 1. The image is a bit sharper, and there’s more contrast—but the flaws have been enhanced as well (the triangular blotch, for example, obscures all the underlying detail of the scarf).
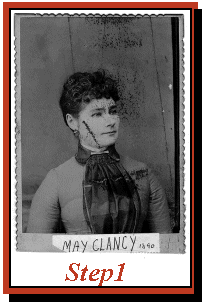
Letting a software program do the initial tinkering often works well, although at times the computer’s idea of a good photo and your own may differ widely (in such cases, I undo the software’s work, and proceed on my own). There are a number of independent photo enhancement programs on the market, and most do a reasonably good job, bearing in mind that a $50 program will never substitute for a $500 one like Photoshop.
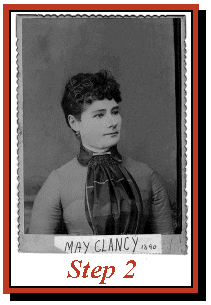
The next step was the laborious one (almost three hours). Using what is called the "clone tool" (also called the "rubber stamp"), I replaced the damaged portions of the image with pixels copied from other areas of the picture. In a way, it’s an electronic facelift: By selecting a small area of "good" skin, I could replace the bad skin next to it. Piece by piece (or pixel patch by pixel patch), I restored May’s girlish complexion. More difficult were the eyes, which required reconstructive surgery; the whites had to be painted back in, and the pupils rounded.
Restoring the backdrop was simple, if time-consuming. But the scarf was the greatest challenge, since whole portions of it had been obliterated. Using the "dodging tool" (named after the similar process in darkroom photography), I lightened the area to reveal as much of the underlying detail as I could. Then began the long process of reconstruction, either by "cloning" similar patterns from other parts of the scarf, or actually painting in details that had been lost. That left me with Step 2—a much better image, but still a bit flat.
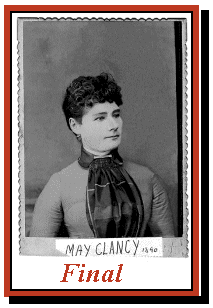
By squeezing out the all-white and all-black ends of the gray scale (using the "Levels" command), I enhanced the middle tones, and then increased the contrast, which separated May a bit more from the background, and brought out detail in her face and clothing. On the negative side, it also darkened her hair enough to obscure the detail there, and almost lose entirely the pearl clasp on the right side of her head. With the dodge tool, I restored the lightness in the hair, but the barrette remained obstinate. Returning to the Step 2 image, I selected only the jewelry and copied it. This image was pasted into the restored photo, resized it until it fit perfectly, and then feathered into the surrounding area.
Finally, zooming the image to five times its normal size, I corrected any flaws I had missed the first time around: a "blemish" on the right side of her chin, a slight bulge on the left cheek line, the background at the lower right edge of the photo, and some overbearing shadows on the left side of the dress. As a last step, the photo was reduced to 72dpi, which is the standard printing resolution.
That’s it, Miss Clancy. You look like a million bucks!
Editor's note: This article, written almost 20 years ago by one of our photo volunteers at the time, is somewhat dated in its references to software and hardware (a 686 with 32 megs of RAM?), but the techniques used by Mr. Ogar are just as relevant today as they were then.